| Animate Noise |
If on, the random number seed for the jitter functions for antialiasing is changed for each frame when rendering an animation. If off, sets the same value for the entire animation. If the camera is static, set the option to off so that the same antialiasing jitter values are used between frames and there will not be subtle lighting changes between frames. If the camera is moving, set to on to provide better antialiasing. |
| Clamp Colors |
Suppresses all color values in a rendered image to truncated 24 bit values prior to anti-aliasing producing cleaner result in areas of extreme contrast. Note: You will lose any extended dynamic range present in the image (making proper tone mapping impossible). If you intend to save your image in an high dynamic range format, leave the setting disabled.
Tip: Instances where tone mapping is not needed, any apparent blocks can be minimized by adding a small amount of Bloom which adds a small amount of dithering to reduce or eliminate banding in gradations.
|
| Convergence Distance (Meters) |
Sets the point within 3D space where the two offset images converge. In front of this point, objects appear to come forward and behind the point, objects appear to recede. |
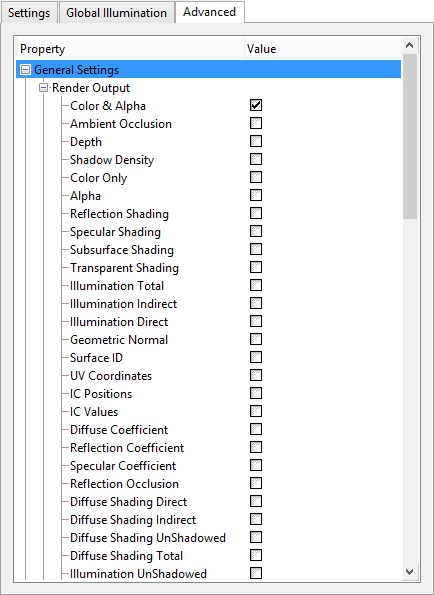
| Diffuse Coefficient |
This setting is in the Render Output tree. The Diffuse Coefficient output renders the diffuse colors of a scene independent of illumination or shading. |
| Diffuse Shading Direct |
This setting is in the Render Output tree. The Diffuse Shading Direct output renders a channel of the diffuse color and shading of all objects in scene by all direct light sources independent of other surfacing attributes. This output is basically a combination of diffuse coefficient and direct illumination. |
| Diffuse Shading Indirect |
This setting is in the Render Output tree. The Diffuse Shading Indirect output renders a channel of the diffuse shading of all objects in scene by all indirect light sources independent of other surfacing attributes. This output is basically a combination of diffuse coefficient and indirect illumination. |
| Diffuse Shading Unshadowed |
This setting is in the Render Output tree. The Diffuse Shading Unshadowed output renders a channel of the diffuse color and shading of all objects in a scene by all light sources, independent of other surfacing attributes. It excludes the shadows cast by direct and indirect light sources. |
| Diffuse Shading Total |
This setting is in the Render Output tree. The Diffuse Shading Total output renders a channel of the diffuse color and shading of all objects in a scene by all light sources, independent of other surfacing attributes. |
| Direct Light MIS (Multiple Importance Sampling) |
Multiple Importance Sampling intelligently samples direct lighting for both specular and diffuse shading, greatly reducing noise without a significant increase in render time. Options are Both, Specular Only, Diffuse Only or None.
|
| Direct Light Samples |
Sets the total number of samples generated for all lights in a given scene.
|
| Displacement Rate (pixels) |
Controls the number of polygons created during Micropoly Displacement rendering of displacement maps. Increasing this setting will decrease the number of polygons. Even small changes to this value will have a large impact on overall polygon count. The default value of 1 means that any micropolygon that has an edge longer than 1 pixel will be further tessellated. |
| Displacement Ratio |
Controls the amount of subdivision in areas of the scene that are not visible to the camera. Low values will create more polygons and vice-versa. This setting works in tandem with the Displacement Rate setting, letting you balance the amount of micropoly displacement in a scene so that memory usage can be kept to a minimum.
|
| dpdu Vector |
This setting is in the Render Output tree. The dpdu Vector setting is a world space vector that points in the direction of increasing U at each point on a surface that has a UV map. dPdu Vector has a big effect on the antialiasing of UV image maps and also define the reference directions for anisotropic highlights and reflections, so the outputs are useful for debugging. |
| dpdv Vector |
This setting is in the Render Output tree. The dpdv Vector setting is a world space vector that points in the direction of increasing V at each point on a surface that has a UV map. dPdv Vector has a big effect on the antialiasing of UV image maps and also define the reference directions for anisotropic highlights and reflections, so the outputs are useful for debugging. |
| Edge Weighting |
When Luxology calculates the Depth of Field, rays are fired in a pattern that simulates the iris blades, producing the bokeh effect shapes. The edge weighting option concentrates those rays toward the center or edges of the iris, depending on the value. A value of 0% concentrates all the values at the center of the iris, while a setting of 100% concentrates the rays toward the outer edge. A value of 50% (default) evenly distributes the rays. A light tends to be stronger in the outer edge of the iris in the real world, so a setting around 60% to 70% tends to produce the most realistic results. |
| Environment Importance Sampling |
If on, takes into account the brightness of HDR images used for image based lighting. Brighter areas of the image have a greater effect on the lighting result, so when enabled, samples concentrate around these brighter areas producing a more accurate, smoother result with fewer IC rays, which means faster rendering.
|
| Environment Importance Samples |
Sets the number of samples taken of the environment used for global illumination. More the number of samples, higher is the accuracy of the render output, but at the cost of increased render time.
|
| Force Double Sided |
If on, forces all material to render as double-sided. This method is less efficient than Force Single Sided but can be useful for setting up a scene. |
| Frame Passes |
The Frame Passes value is used to improve the quality of fur renderings. By providing additional Frame Passes, the fur density is improved without the memory overhead of setting the fur spacing to very small values. When Frame Passes greater than 1 is used, the render time takes longer (roughly n+1 where n is the render time of the initial pass less the preprocessing time). If Frame Passes is set to a value other than 1, the buckets are not displayed during the render. Frame Passes greater than 1 does not work with Distributed Rendering; if Distributed Rendering is used the Frame Passes are ignored.
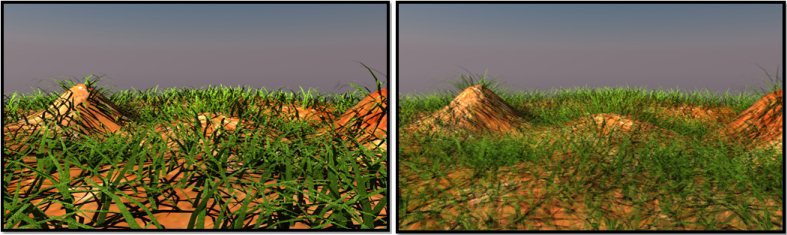
Left: Frame Passes set to 1 (10 second render); Right: Frame Passes set to 4 (33 second render)
|
| Geometric Normal |
This setting is in the Render Output tree. The Geometric Normal output simply renders all meshes with a color ramp based on the angle of their polygonal normal. The geometric normal is calculated exclusively by the polygonal geometry. It is useful for evaluating the continuity of a mesh’s surface. |
| IC Positions |
This setting is in the Render Output tree. The IC Positions output will display the pixel positions used in generating the irradiance cache values shading based on the settings specified under Global Illumination tab. Green points are positions sampled during the initial pass, Red points signify additional sample generated by the Interpolation Values setting. This output can be useful in analyzing various IC settings. |
| IC Values |
This setting is in the Render Output tree. The IC Values output will display the diffuse values calculated during the initial irradiance cache render pass. The image will appear splotchy as each irradiance sample is not blended with nearby samples, giving a much better understanding of the area affected by individual IC positions. IC Values can be useful in analyzing various IC settings. |
| Illumination UnShadowed |
This setting is in the Render Output tree. The Illumination UnShadowed output generates a channel of the full illumination in a scene, excluding shadows cast by direct sources, independent of all other surfacing attributes. |
| Indirect LOD |
If on, Luxology holds an additional lower resolution version of displaced geometry used strictly for calculating Indirect lighting, which reduces overhead in global illumination calculation. If on, slightly more memory is required as two distinct copies of the same geometry are held in memory simultaneously. |
| Interocular Distance (Meters) |
Sets the measured offset between the two rendered images. Default is .065 meters. |
| Iris Blades |
Controls the way the blurriness looks in images with a shallow depth of field, generally referred to as "bokeh." Bright areas, when out of focus tend to take on the shape of the camera’s Iris, smaller numbers of blades make more obvious geometric patterns to the bokeh shapes, while larger values look more circular. A setting of 0 (default) produces a perfectly circular shape. |
| Iris Rotation |
Used to change the rotation angle of the virtual Iris when rendering shallow depth of field in images, which in turn rotates the bokeh shapes in the final rendered output. |
| Lens Distortion |
Adds a distortion factor to the rendered image, where a positive value produces a "barrel" effect and a negative value produces "pin cushioning." |
| Lock Convergence to Focal Distance |
If on (default), locks the convergence distance to the focal length. |
| Luminous Shading |
This setting is in the Render Output tree. The Luminous Shading output generates a channel of all the luminous shadings within a scene, independent of all other attributes. This method can be used to see what materials in a scene are using Glow. |
| Maximum Radiance |
Controls the maximum radiance carried by a light ray. This can be helpful in reducing noise and preventing "fireflies" (single bright pixels) caused by small but very bright features of a scene, such as tight specular highlights or surfaces very close to point light sources. Setting Maximum Radiance to '0' (the default) means that a ray can carry unlimited radiance.
|
| Micropoly Displacement |
(Applies to textures containing displacement maps only) If enabled, textures containing displacement maps are tessellated. |
| Minimum Edge Length (mm) |
Sets the distance below which an edge of a polygon is not split. |
| Minimum Importance(%) |
Sets the percentage or fraction of a pixel the shading evaluation represents, which depends on how many antialiasing samples are being shaded together as part of a single evaluation versus the total number of antialiasing samples in the pixel (i.e. an estimation of how much a particular shading evaluation will contribute to the final color of a pixel). Example: If there are eight AA samples in a pixel and they are all shaded together as a group (which can happen if they all belong to the same surface and the Shading Rate is large), that single shading evaluation entirely determines the pixel color and thus has an importance of 100%.
At the other extreme, if each antialiasing sample is shaded separately (which can happen if the Shading Rate is small or zero), then each of the eight shading evaluations will have an importance of 1/8 or 12.5%.
At 100% importance, the full number of rays specified will be used. For example if there are 64 blurry reflection rays specified in a material's properties, then 64 rays will be fired during the shading evaluation. But in a shading evaluation with 12.5% importance, only eight reflection rays (12.5% of 64) will be fired.
Note: This importance value is used to modulate the number of rays used to compute various phenomena such as soft shadows, Monte Carlo indirect illumination, blurry reflections, etc.
|
| Motion Blur |
If on, performs motion blur on moving objects. |
| Motion Blur Length |
Sets the duration of time that the shutter is open. A 180-degree shutter time is equivalent to a value of 50%. |
| Motion Blur Offset |
Controls the center position, in time of the samples taken. A setting of -100% moves the shutter back one frame; 100% moves the shutter forward one frame. |
| Outlier Rejection |
Specifies whether to disregard rays that are much brighter or darker than the averaged values in a particular direction when Irradiance Cache values are being computed and Supersampling is enabled. It can be useful for smoothing of indirect illumination in some cases.
|
| Refine Bucket Borders |
If on, modo engine will assume that all border pixels in a given bucket require refinement. Due to the "bucket" nature of the Luxology render engine, adjacent pixels in neighboring render buckets can't be used to decide whether a border pixel needs further refinement because they are either not rendered yet, or fully rendered and no longer active.
|
| Refinement Shading Rate |
Lets you set a higher quality evaluation that is computed only for pixels that are identified by the Refinement Threshold as "problem areas." |
| Refinement Threshold |
Sets the contrast tolerance, which dictates how much contrast between samples is acceptable. Set to 100%, the Refinement Threshold would do nothing at all as it would accept brightness steps as high as 255 (the upper bound of 24 bit images).
Set to 0%, no pixels would be inside the threshold. The range of control spans the 0 to 255 brightness steps so that a threshold of 50% would accept pixel contrasts of 128 steps whereas a setting of 0.1 would only tolerate 25 brightness steps between samples. Once the pixel has been evaluated, if it is determined that the brightness contrast of samples exceeds threshold, that pixel is re-evaluated using the Refinement Shading Rate.
|
| Reflection Coefficient |
This setting is in the Render Output tree. The Reflection Coefficient output renders a scene as grayscale image that represents the reflection amount. Black for 0% reflectivity ramping towards white at 100%. It does not take into account the settings of Fresnel. |
| Reflection Occlusion |
This setting is in the Render Output tree. The Reflection Occlusion output renders a channel that is strictly black and white. This determines if a reflection ray off of an object has hit any other geometry in the scene. White if the reflection ray has hit another object in the scene and black if it has not. |
| Render Point Clouds |
If on, point cloud data is included in the rendering process. |
| Shading Normal |
This setting is in the Render Output tree. The Shading Normal output renders all meshes with a color ramp based on the angle of their surfaces shaded normal. Where the geometric normal is calculated exclusively by the polygonal geometry, the shading normal takes into account surfacing attributes effect on normals such as bump maps. |
| Shift Geometry for Pixel Grid |
If on, shifts geometry appropriately for creating icons aligned to the pixel grid. The default is off. |
| Smooth Positions |
If enabled (default), when a surface is diced into micropolygons, the initial positions of the micropolygon vertices lie on a curved surface based on the original smooth vertex normals. If disabled, all the initial positions of the micropolygon vertices will lie exactly on the flat planes of the original polygons.
|
| Spectral Samples |
The higher the number of rays, the smoother the dispersion calculations will be, at the expense of longer render times. When rendering any transparent refractive surfaces with dispersion, the Spectral Samples value determines the number of rays that each dispersion ray is broken into.
|
| Specular Coefficient |
This setting is in the Render Output tree. The Specular Coefficient output renders a grayscale image that represents the amount of specular on surfaces within a scene. Black for 0% specularity ramping towards white at 100%. It does not take into account the settings of ‘Fresnel’. |
| Surface ID |
This setting is in the Render Output tree. The Surface ID output renders each material with a random color. This can be used as a diagnostic shading option, as it may be helpful in spotting surface relationships in complex scenes. The Surface ID is also used to create Piranesi EPIX files. |
| Use Displacement as Bump |
This option allows you to use a higher displacement rate (meaning fewer polygons) while maintaining the same visual quality and improving rendering speed. If on, Luxology applies any displacement maps also as a bump map, providing finer detail that requires lower number of subdivisions to achieve. This reduces the amount of memory necessary to render complex scenes when combined with lower subdivision rates. |
| Use Fixed Luminance for Tone Mapping |
If on, tone map is set around a fixed luminance, rather than using the average luminance of an image to tone map. |
| UV Coordinates |
This setting is in the Render Output tree. The UV Coordinates output generates a channel that converts UV positions to a color value. Using other software you can utilize this image to reapply a texture map to the object after it has been rendered. |
| Volumetrics Affect Indirect |
This setting is in the Global Illumination tree. If on, applies the Volume Lighting effect to Indirect light. |
| Irradiance Smoothing |
This setting is in the Global Illumination tree. It smooths out the blotches which can occur due to poor sampling on a surface when calculating global illumination using the irradiance cache technique. |